Thursday, March 22, 2012

James Benjamin Strickland is BORN!


Well Baby Buckeye has arrived!

James Benjamin Strickland
arrived at 1:26 AM
on Thursday, March 22, 2012
weighing in at 8 lbs. 5 oz.
and measuring 21 inches long!

Baby James is definitely different from his BIG sister.  Not only does he completely outweigh our skinny minny who came in just under 6 lbs., but he is a very patient and healthy baby boy. He has also fed really well and filled up some diapers! We are so thrilled to experience labor without inducement and leg pain...and praying for no NICU too!

Tuesday

Contractions started on Tuesday night and continued into Wednesday day. By about 4PM they were about 10-20 minutes and had no rhythm. By 5PM they were getting more consistent and getting about 5-7 min. apart. We headed up to the hospital at about 7PM. We were admitted and had the epidural by 10PM. At 11PM we got a little dose of pitocin to get things going a little smoother. At 1:06 I was suddenly fully dilated and James' heartbeat was not staying steady. After waiting for the doctor to show up and three pushes later, James, AKA Canon, was born :)

James is doing very well! He is feeding well and is a great sleeper!


Mommy is doing great, as well. We are so blessed to see her back hold up so well over the whole term and labor of this pregnancy. It is such a different experience! Thank you for all your prayers over these past 9 mos.

Leona got to meet her baby brother today. At first she was pretty hesitant, but then she was excited to see "baby". She even colored a special picture for him and Mommy!


Thursday, March 15, 2012

Baby Buckeye's Necktie and Bowtie Onesies

I found this amazing craft on the Crap I've Made blog. I thought it was so adorable that I had to give it a shot. It was so easy to do.


Here is what you need:
-Wonder Under
-1/8 yard of any fabric you desire (really it could be any scrap the template fits onto)
-onesies of any size or color
-pen
-scissors
-iron

The original craft was only for neck ties. I decided I wanted some bowties, so I made my own template. Then, I even got creative and made the letter to his first name on 2 shirts. You really could do any design. If I had a cricut, I would have gone crazy I'm sure :)

Here are the template pictures I used:


(If you are interested, I can send you the PDF I made with the templates.) I used 3 button material cut-outs for the bowtie, just drew one.

Here are some pictures from my process:
Start by putting the rough side of the Wonder Under to the wrong side of
the fabric. Iron together with a hot dry iron, holding it
there for 5-8 sec.

Trace the pattern onto the Wonder Under side.
Cut-out!

Peel the Wonder Under paper off. Place it on your onesie.
Slightly iron on the knot piece at the top.
Slide the long piece under the knot piece. Iron the whole piece.

Here are some of my finished onesies and cut-outs.


Aren't they so adorable!!!  One word of caution when you are making them: Most of my onesies did not have a tag. Instead they had a tagless sticker that said the size and brand. My iron touched these and it melted black all over my iron and then on one of my onesies :( I couldn't figure it out at first. I was so bummed!!!

On the blog I got this idea from, she sewed her fabric on once she was done. I am going to try not sewing them. In reality the Wonder Under should be sufficient. If they start coming off, I will sew them.

----------------------------------------------------------
UPDATE:
Yep they started coming off with the first wash. I went back and just sewed them by hand.

Tuesday, March 13, 2012

Cloth Diapering for My Family

You can read my previous post Cloth Diapering in the 21st Century for more background information on the types of diapers out there.
This post is basically my experience cloth diapering and the How-to's.
When I first thought about cloth diapering, I had so many questions. Hopefully I can answer them for you.

What kinds of cloth diapers do we use?
I love my prefolds. I bought the Chinese large prefolds to start with.  I love the absorbency and how easy they are to wash.  I do suggest 2-3 sizes if you are staring with a newborn.  I will be using the Green Mountain Diaper Indian prefolds called Cloth-eez with my 2nd baby. (UPDATE: I LOVE THE CLOTH-EEZ so much better!) I like the idea of the smaller sized prefolds to keep them from being too bulky. If you look on the Green Mountain Diaper website, you will find so much information that I still go back and review.

What kinds of cloth diaper covers do we use?
I love the Bummis Super Brite and Thirsties diaper covers. You can find some pictures and explanation of these covers in my post Cloth Diapering in the 21st Century. I find that the key is to find a cover that has leak proof leg guards and the PUL material inside so you can wipe them clean and use them again.


What is my experience with pocket diapers?
I originally started with only Bum Genius 4.0 pocket diapers to see if I could handle cloth diapering. These were too difficult to wash.  They often needed to be washed 4 times because the smell never came out all the way. There is nothing worse than putting on a semi-fresh smelling diaper onto your baby. YUCK! These diapers were also crazy in price...like $25+ a piece. I did keep like 6 of them for an easy solution though.  These are just as easy as a disposable diaper to put on, velcro and go. I also hated how bulky these were on my skinny-minny daughter. I know some Moms live for these diapers, so this is just my experience.

Do we save tons of money?
Many people set out to save loads of money. You definitely save money over disposables, there's no doubt. The latest statistic from this site states that most people spend from $2300-1800 in disposables over a 3.5 year time span on 1 child. You will definitely save money if you just look at the cost of the diapers; however, there are some other factors that play into how much you save though: (1) what kinds of cloth diapers you buy (2) how many cloth diapers you buy (3) how many washer and dryer loads you do (4) how much you spend on your detergent (5) how many children you use them on (6) diaper pail and liners (7) any disposables you buy for trips or night time use.

Obviously the more you spend on your cloth diapers, the less money you will save in the long run. If you go the Bum Genius 4.0 pocket diaper route and buy 30 at $25, you are looking at a huge chunk of money.  If you go the prefold route and buy second-hands, you may only spend $200 on a whole set with covers. To save in these areas, I have stalked eBay for great covers and prefolds that have been barely used. (Another great way to save money is to sell them to others when you are finished with them!) Obviously if you use all of those diapers on 5 children, you will definitely save tons of money over the long-haul!!!  There is another BIG factor though, you have to consider the washing of these diapers.

First there is a cost to run the washer and dryer. I will discuss this in depth later, but I figure this is about $10-20 on our electric bill a month. Then, there is a cost for the special detergent you need to use. I will discuss this in detail later too. For us, we make our own homemade laundry detergent which costs us pennies per load. We CAN NOT use this detergent for our cloth diapers. Typical laundry detergents contain brightners, fragrances, dyes, enzymes, fabric softener, and other types of additives that are left behind on the fabric. These chemicals and the soap in our homemade laundry detergent can cause rashes and repell the wetness causing your diapers to leak. We have to buy a clean and clear detergent which costs anywhere from $.17-$.30 a load. This adds up fast when you wash your diapers 2-3 times every other day. This is about $.40-60 every other day, making it $6-9 a month. I also add in things like Oxy Clean, peroxide, vinegar and Borax at times, adding to that total cost...so a total detergent cost of about $10-15 a month. So you are looking at another $30-35 a month on detergent. I do emphasize that you DO NOT want to use additives on your covers as it can wear them down. In fact, sometimes I take the covers out after the first cold wash. (A friend has informed me that she has used a cloth diaper homemade laundry detergent. I am still researching it. I will update this if I find that it works.)

Another cost is buying a diaper pail and liners. This is normally a trash can with a good lid and the liners are like $20 each. We have two we switch out. We also have a wet bag that goes in the diaper bag to hold the wet cloth diaper when we are out.  They run like $10-15. Not a big cost, but a factor...although I guess many disposable using Moms use a diaper genie or some kind of pail too.

The last cost is that you will probably still use disposables at times. We use them at night when baby is sleeping through the night and going potty a lot. We also use them when we make trips to Ohio or are out for the whole day. I know many of my friends just take wet bags with them and use their cloth diapers. Sometimes it is just not convienent...like a whole day at the zoo...who wants to carry 6 wet diapers around!! If I am out for a short while, though I do carry my wet bag. Another time we use disposable is when the baby is sick with a lot of runny bowel movements. It is just nicer to not mess with 15 nasty diapers. For me, I also use NB diapers for a few weeks when baby is born to get my grip on things. Mommy healing and adjusting is more important than trying to throw another step in the mix.

So...we definitely save money, just probably not the thousands on 1 child that I thought we would. I can't wait to use them on my second child coming soon so I can see more return for our investment. Saving money is my main purpose, but another reason is the help for the environment. So many diapers go and sit in the landfills! If I can save even half the diapers I would have thrown in the trash by using cloth, it is worth it in my mind.

What do we do when we change a diaper?
If it is just wet, throw it into the diaper pail and put on a new one. If there is boom-boom, dunk it into the toilet and put it into the diaper pail. Some choose to buy a diaper sprayer for the toilet to help. Some people also choose to just dump a hard stool into the toilet and not dunk. Of course when you dunk this means pulling out some rubber gloves. If your baby is breastfeeding, their stool is water soluable, so it can actually go right into the washer, I hear. I'm not that brave with the hard stool. If it is soft or running like with a newborn...definitely it goes right in the washer. It may save you dunking though.

What do we use for a diaper pail?
My MIL use to use a wet pail. She would fill up a 5 gallon bucket with water and some detergent and soak her diapers. I use this sometimes but only with prefolds.  You can not soak covers or pocket diapers with PUL. Typically I use a dry pail, especially with younger babes. I just take a trash can with a nice closed lid. With my first, I used a diaper pail liner by Wahmies to line the pail. When it is diaper washing day, I take the whole liner out with the diapers in it and throw them into the washer....liner and all. Sometimes the liner will cause condensation and end up making me clean the pail. Often times this is when I just do a wet pail for the next batch (remembering to keep the covers in a separate bucket or wet bag) to clean it out in the same step. With my newborn I am using a 5 gallon bucket with a lid from a hardware store and LOVING IT!

How do we wash our diapers and covers?
First of all, I buy covers with PUL inside so I can wipe them clean and use them again if nothing got on the leg part. I hand wash these often. When they get really dirty or boom-boom on them, I put them in the wash with my prefolds. I always hang them to dry to prevent drying out the PUL and damaging them. Sometimes I pull them out after the first cold cycle and hang them to dry.

Now for the washing part. First, you need a free and clear detergent (more below). Now, just dump your prefolds, covers and pail liners into the washer. Put it on a spin cycle to get rid of any remaining pee. Next, put on a rinse cycle to again wash anything away. Now, put it on the right size load on COLD. I use my normal cycle. The cold cycle helps to remove any stains. I put detergent in this load.  If I am not washing covers or liners, I will sometimes add 1/2 cup vinegar to the load to help get out any stains. I will put it on an extra rinse to really make sure these are really washed out. Next, I do a HOT load. I sometimes add Oxy Clean FREE or 1/2 cup of Borax to the load and my special detergent, again only if there are no covers or liners in the mix. I add another rinse cycle and then an extra spin cycle to dry them out as much as possible.

REVIEW:
-spin cycle to remove any excess pee-pee
-rinse cycle
-COLD cycle with detergent (sometimes I soak them by stopping it after it fills up with water)
-extra rinse cycle
-HOT cycle with detergent
-extra rinse cycle
-sometimes an extra spin cycle to dry them better

If you are having trouble with an ammonia smell on your diapers, here is a great site for help. Just remember that your covers can not go in a load with vinegar or other products besides your detergent.

Drying is pretty easy. If you have pocket diapers or covers, always hang them up.  Prefolds can be hung or dried in the dryer. Hanging them outside can help with staining too. It's amazing what the sun will do with stains :)

NOTE: If you buy prefolds, you have to wash and dry them a couple times before the first use.

What about the boom-boom in the washer?
This was a concern of mine...sounds gross. I clean out my washer every week with 1 cup of vinegar to an XL load setting in HOT water. This probably isn't necessary, but I feel better when I do it.  In fact, I do this about every 3 months if I am not cloth diapering too. It helps with any build up that may occur. You do need to make sure no large pieces of stool are put into your washer. Make sure to dump or dunk those diapers into the toilet before you put them in the pail. I hear that if you are breastfeeding that the stool is water soluable, so less likely there will be build up.

What kind of laundry detergent do we use?
Here is a great site for finding a good detergent. It has ratings for each. I suggest only getting a **** detergent. One detergent I use that is not on the list is Trader Joe's. My college roommate uses Charlies Soap and loves it.  I plan on trying a new detergent this next time. I will update this with the kind I try. I have used just Borax. It is not sufficient on it's own. Sometimes I use it as a boost though. I have also used Melaeuca before I saw it's rating...terrible.  If you don't use a free and clear kind, your diapers will leak from the soap and additives in it.


Another friend of mine suggested a DIY cloth diapering detergent. I have not tried it yet, but here is the site. The true test of a laundry detergent is to use it for at least a few weeks. It may take a while beore there is any build-up on them. Honestly I am a little skeptical of such a simple recipe, but willing to try it because I trust the friend who uses it. When I try it, I will update this with my personal experience using it.

I hope this helps many of you get started. Feel free to ask me any questions in a comment below. These are all my opinions and I imagine many cloth diapering Moms may even have different ideas. I know some Moms completely disagree about the saving money opinion I have, but these are the results I have found with our family. If you have different opinions, feel free to share those too!

Cloth Diapering in the 21st century

Ok. Many of you would probably cringe at the mention of cloth diapering. I find that many people don't quite understand how far cloth diapering has come since your Momma or Grandma diapered their children. So let me see if I can spell out how cloth diapering works for our family.

Types of Diapers
There are many types of diapers out there now-a-days. For me, I started with a pocket diaper to see if I could even handle cloth diapering. Once I knew I could handle the idea, I switched to prefolds...which for me is the way to go. I will write another post about how I go about cloth diapering. For now...I need to give you a history lesson.
Prefolds
Many of you probably think about cloth diapering with the idea of prefolds. This old school diaper is usually made of cotton.  It has a thick layer in the middle and 2 thinner side layers. Sometimes you'll see things like 4X8X4. This tells you that there are 4 layers on the sides and 8 in the middle. There are many different types of prefolds. First there are bleached and unbleached, which is exactly what it sounds like...the bleached ones have been bleached white where the unbleached ones are a little creamy looking. There are also Chinese prefolds or Indian prefolds. I have half and half of each. The Chinese prefolds seem to come in larger sizes. I like the GMD (Green Mountain Diaper) called Cloth-eez.  They come in great sizes and are trimmed in a color to easily tell which size you are using. A word of caution too...if you are looking at Gerber cloth diapers in Wal-Mart or Target, these are NOT prefolds.  These are meant to be used as burp cloths, not as prefold diapers. They are made of birdseye or gauze and are not absorbent enough. They will leak in 5 sec. The key is to find a diaper that are 4X8X4 (unless it is a preemie size).

Prefolds require covers.  This is where the idea of your Momma or Grandma cloth diapering totally changes! There are MANY types of cloth diaper covers out there. Green Mountain Diaper has a great page discussing all kinds of covers here. I am only going to touch on what I know. Many covers are made of a material called PUL. It stands for polyurethane laminate. This is the layer that makes the diaper cover waterproof.  It is not like those plastic pants that have been used in the past that leak all over. Many of the covers have the PUL layer inside so they can we wiped clean and used again. This is my preference. Any cover that does not have this slick layer inside has to be washed after 1 use, meaning 1 cover per prefold.  My go-to covers are the Bummis Super Brite, and Thirsties diaper covers . These covers have a gusset around the leg that prevents any leaking. Some of the Thirsties come in snap closures at the top. I have found that velcro is the way to go. They seem to last longer. The Bummis Super Brite comes in sizes NB-XL. The Thirsties diaper covers come in sizes XS-XL.  Prefolds sound hard because you have to fold them, but they are actually quite simple. Here is a site that can help you learn to fold them. Also, with a cover there is no need for those large safety pins from the past.  You can still use them or a Snappi to hold the prefold if you think you need it. A snappi is much safer than those large safety pins that can really poke your child.
Bummis Super Brite
Close-up of the BSB leg protection
Thirstier diaper cover with velcro closure


PUL material inside the covers.

prefold with cover on baby

prefold folded inside a cover
snappi on a prefold


Pocket Diaper
This is a great diaper for those of you who need an easy cloth diaper that goes on just as fast as a regular disposable. As I stated above, I started with these. Basically this diaper is like a diaper cover shown above only it has fleece inside it that goes against baby's skin. The micro fleece actually is a pocket where you put a thick insert to absorb the wetness. I started with some Bum Genius 4.0. These were very easy to use.  A dad or babysitter could definitely use these with no problem. I found that there were a couple of negatives though: very pricey, hard to clean/wash, can only be used once, and very bulky on small babies. I have not tried other pocket diapers that are sized(meaning they have them for each size NB-XL) and I am sure many people enjoy the ease of using these diapers. I did keep a couple of my Bum Genius for times when I need an easy solution.
Bum Genius 4.0


As you can see an insert or prefold is inserted into the pocket.

AIO (All in One) Diapers
AIO diapers are very similar to a pocket diaper.  The only difference is that the insert is sewen into the diaper and can not be removed. Here is a Youtube video about the difference between an AIO and a pocket diaper. I have no experience with these, but since I am not a pocket diaper fan, I doubt I would enjoy these either.

Fitted Diapers
Basically fitted diapers combine the idea of a AIO diaper and a prefold/cover combination.  Basically this diaper is made of a fleece material and snaps for easy closure. There is no folding or pinning. Just snap to close.  Then, you take a cover, like the Bummis Super Brite and put it over top to prevent the leaking. Here is a YouTube video about a very popular brand called Kissaluvs. I do not have any experience with this diaper, but it sounds like this would be a great way to go too!
Kissaluv fitted diaper

Now that I have explained what kinds of diapers are out there...I'd like to tell you how it all works. Keep reading my next post Cloth Diapering for My Family.

Monday, March 12, 2012

Making Nursing Pads

Sorry Men out there...just disregard this post :)

I found this great site about making homemade nursing pads. I thought I'd try it out because they looked so easy to make and I have a lot of scrap fabric that I could use to make them.

Supplies
-fleece (1 circle per pad)
-flannel (2-3 circles per pad)
-bowl 4.5" to 5.5" in diameter


Instructions
1. Select your bowl size.
The site suggested a bowl at 4.5" in diameter. Most nursing pads are 5" in diameter that you buy. I think if you are an A-C, a 4.5" bowl would be sufficient.  If you are larger, I suggest a 5.5" bowl. I started with a 4.5" and found that I think I will be more comfortable with my larger sized pads.


2. Trace the bowl onto your flannel piece.
You can use an old flannel sheet or a receiving blanket. I used 2 receiving blankets so the outside looked nice. Then, I used some scrap material I had with Looney Tunes on it for the insides. You'll notice that I did make some Looney Tune ones because I ran out of blankets :)

The site suggested that you fold your material in half so you have only half of them to cut out. I tried that at first and some of them did get off kilter. For me it was a little more work, but made them look nicer if I just traced each individual one out. The fleece was probably came out the worst. I wasted several pieces.

On the site it suggests making some day pads with only 2 flannel pieces and night pads with 3 flannel pieces per pad.  With my smaller pads I made day and night, but afterwards I figured I would just make all of them 3 thickness with the larger pads.


3. Trace the bowl onto your fleece.
You will only need 1 piece of fleece per pad. I used some scrap material leftover from some fleece blankets.


4. Cut out your fleece and flannel pieces.


5. Layer the pad with 3 flannel pieces and 1 piece of fleece.
The flannel piece will go towards your skin and the fleece will face out away from your body.


6. Sew or surge the pads together.
Position the pad at the edge of your foot to decrease the amount you will cut off later. Use a zig-zag stitch. Make sure to overlap the ends of the stitches to secure them.
I started trying to surge them...and boy is that the way to go...only I broke my needle :( so I ended up sewing them. I suggest sewing them with the fleece facing up.  The fleece tended to slip more facing the sewing machine.


7. Trim the edges.
Cut close to your stitching. AND YOUR DONE!


I'll update this post of how well these work when I get a chance to use them! I hope you enjoy this simple project.

Basement Project---We have a ceiling!

Ben continues to work on our basement project.
Last week Ben put up all the insullation.
It was a yucky mess he said.
I was not aloud to go down because of the fibers.
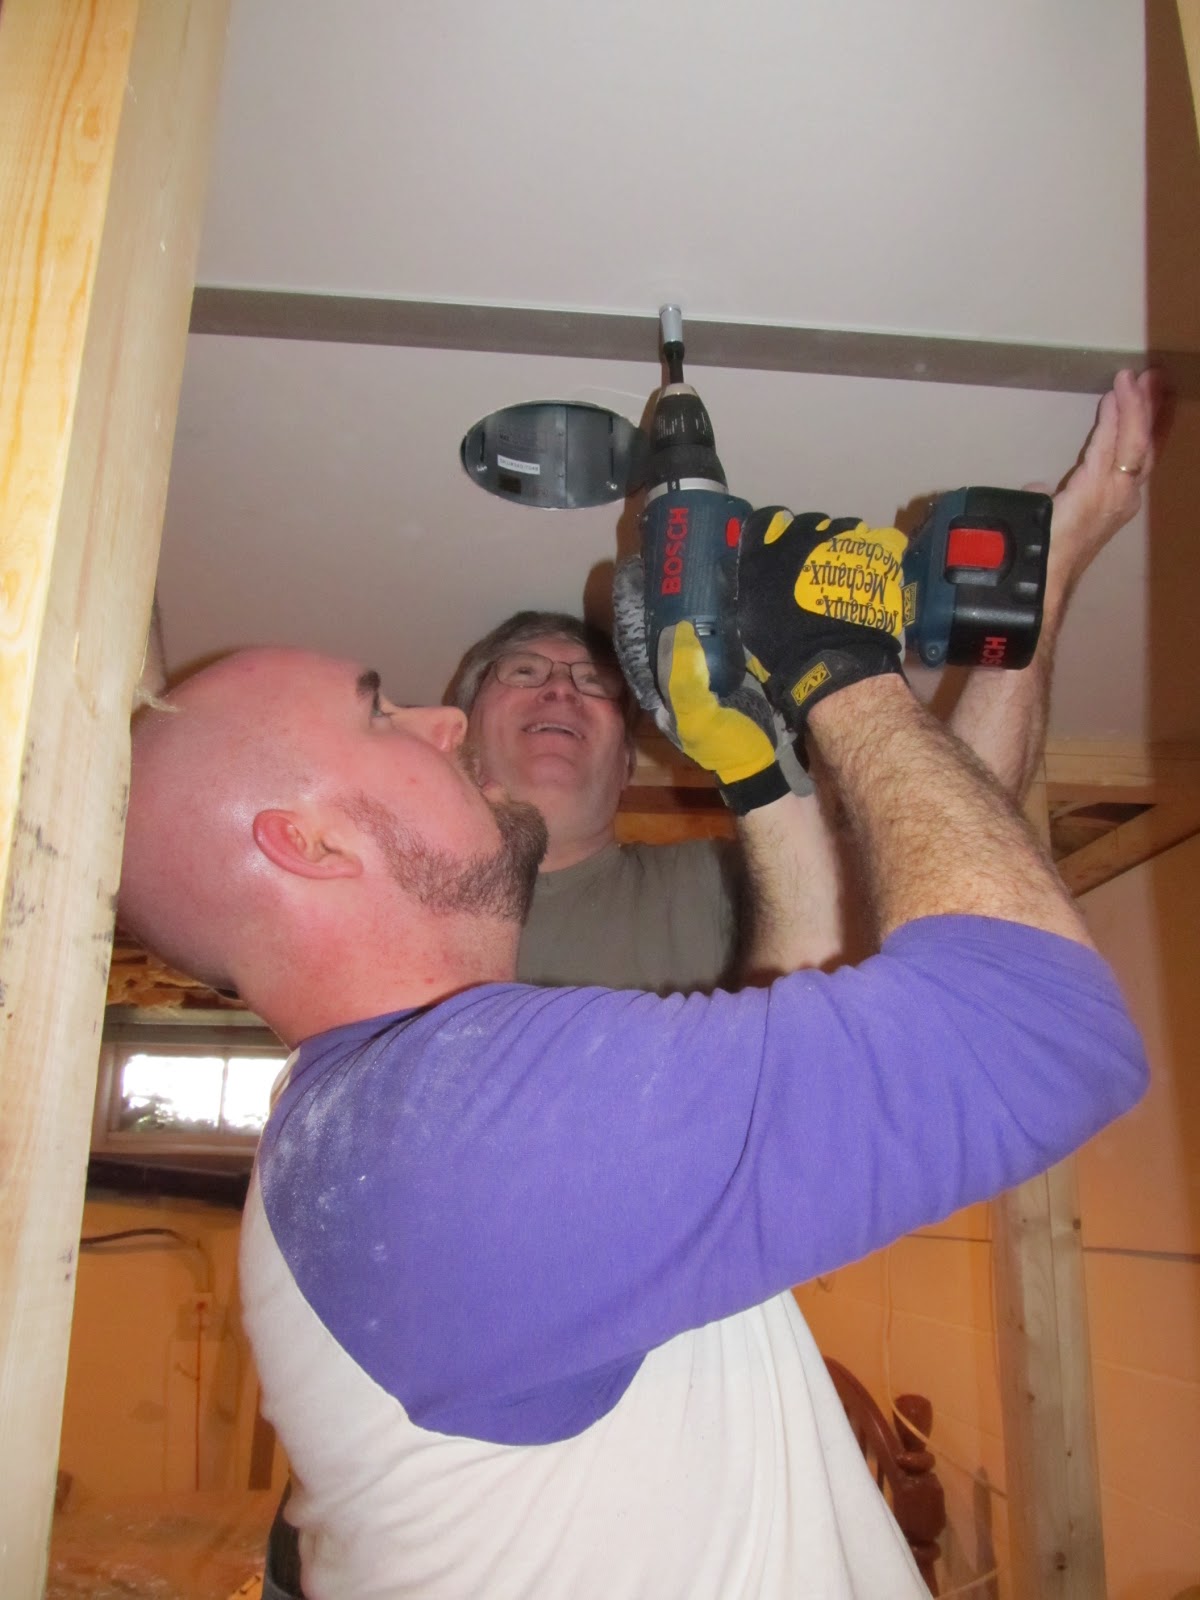
Ben with our neighbor Ken (back) and friend Craig (front)
cutting the first sheet of drywall for the closet.

Ken and Ben putting up the closet ceiling piece. The first piece was the trickiest!


The light hole fits...now to screw it in!

Making progress!!


The bed makes a great step stool!

14 hours later the bedroom ceiling is up and most of the laundry side is done. Today Ben put up the recessed lighting trim and a few smaller pieces of drywall up near the washer and dryer.  Next comes the dividing walls for the bedroom and the door. Hopefully Baby Buckeye will hold off yet so Daddy can get that done before he comes.

Friday, March 9, 2012

When is Baby Buckeye Coming?

When is Baby Buckeye coming?

This is the question ringing in our ears!  As many of you know I have been having Braxton Hicks contractions (BHc) since 22 weeks. He is such a mover too. This pregnancy has definitely been entertaining in that way!

Many of you know that a few weeks ago I went in to the dr. and they ordered an ultrasound to check him because his fetal movement had drastically changed. No caffeine or sugar was going to get him moving either :) He was already measuring 6 lbs. 15 oz. which is about 2 weeks bigger than his age.

This past week was my 36 week check-up. The night before my appt...about 1AM Wednesday morning... I began having a lot of contractions. Some of them were very strong lasting about 3 min., while others were only 30 sec. and barely noticeable. I had about 12 in an hour and a half. They never got in a rhythm and I just tried to go to sleep.  I awoke to several strong ones, but again they never got in a rhythm. By the time I went to the dr. at 11AM, I had had about 30 contractions. My dr. checked me and I was measuring 2cm dilated and 75% effaced (at 36wk5d). She told me that I was not in real labor, but that I would probably not see 40 weeks. The BHc continued into the evening and the next day.

Last night I experienced a 2 hour cluster of BHc, with 2 very STRONG ones that lasted about 40 min. together. With how strong they were, my suspicion is that this has caused some more dilation. I'm officially 37 weeks today and wondering if we will see Baby Buckeye soon!?!?!?!? 

We'll keep you posted!